Mach3 setup tutorial summary
This Mach3 setup tutorial will show you how to connect everything together and how to configure the PoKeys plugin so you can move your CNC.
You can find the previous Mach3 setup tutorial here.
Connecting everything together
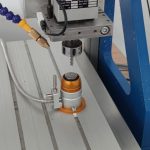
First, you must connect the stepper motors to the drivers. This first step is chosen first intentionally so that you can’t power up the stepper motor driver, without the motor connected by accident.
The stepper motors usually have 4, 6, or 8 wires. In this example, we will use stepper motor and PoStep25-32 stepper motor driver.
As you can see from the datasheet the stepper motor has 8 wires, which we have to connect. We connect them to the driver with the help of this table:
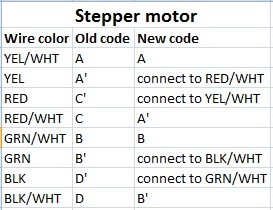
The last column will tell you, which wires to connect together and which ones go to the driver.
If you have a different stepper motor and/or driver you should check their documentation to determine the correct connections. And if you would like to know more about how stepper motors work, you can start reading here.
Connecting PoStep25-32 with PoKeys57CNC
Connecting PoStep25-32 drivers with PoKeys57CNC is easy – use the 10-pin IDC connectors with flat cables to connect the stepper driver to one of the first four motor output connectors. If needed, the cable sets are provided in our store.
Connecting PoStep25-32 with PoKeys57U/E with the internal pulse generator
Next we will connect the driver to the PoKeys57U controller. As shown in the documentation of both products, we connect them with the help of the following pictures:
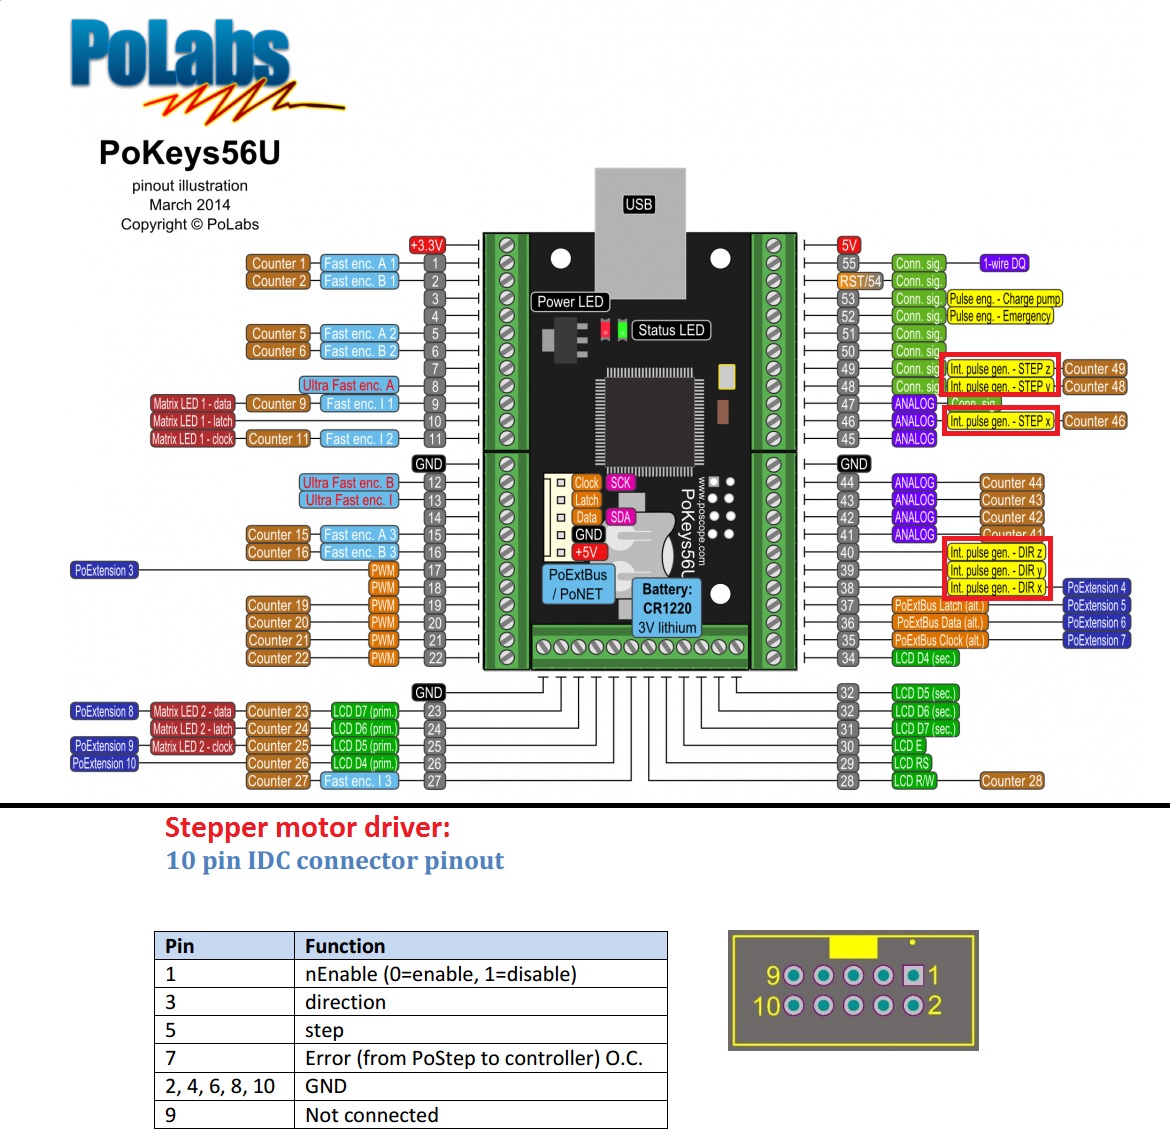
Now you can power up the stepper motor driver since it has the motor connected. Remember to never apply power to the driver without connecting the stepper motor first.
Connecting PoStep25-32 with PoKeys57U/E with PoExtBusOC16-CNC external pulse generator
Follow the instructions in the PoExtBusOC16-CNC user manual on connecting it to the PoKeys57U or PoKeys57E device. Once connected, you can use the same 10-pin IDC cables with connectors as with PoKeys57CNC above.
Configuring Mach3
Now, we will configure Mach3 for operation with PoKeys devices. We will assume that you followed the instructions in the previous tutorial and have added the PoKeys device to Mach3. On first restart, Mach3 will ask you to select the motion controller you want to use – select PoKeys in the list.
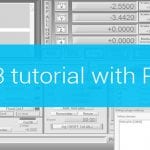
To get to the motor configuration window, click on the »Config« menu the then select »Motor tuning«. A new window should open. Select the axis you want to configure by pressing on the axis button.
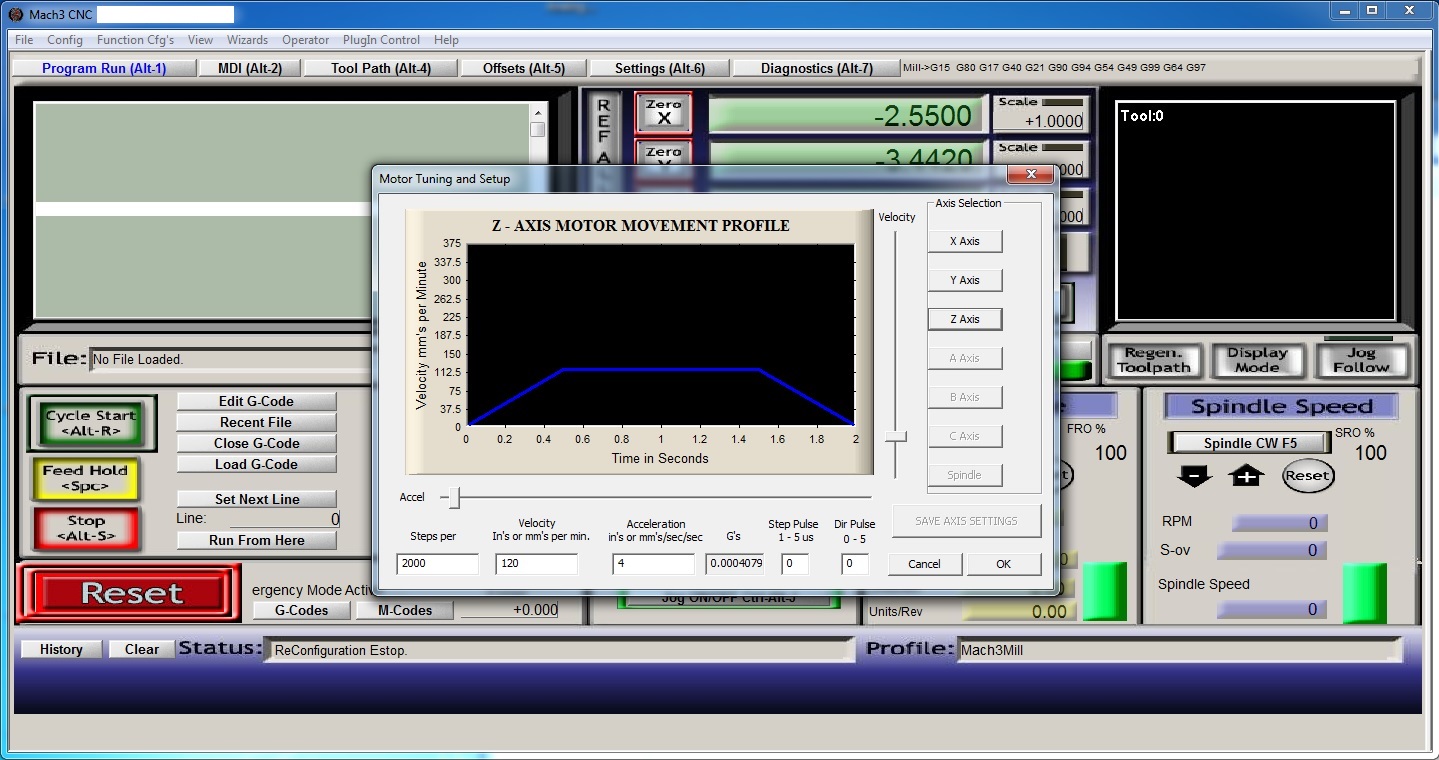
There are a couple of different options we will configure.
The “steps per” tell us, how many steps should a stepper make to move a given unit. If you use mm, that means 1 mm, and for inches, that means 1in.
To calculate this, there is a great excel sheet found here. Just input the values and you should get the right value. You can also leave the value as is since there is another option described later.
The velocity and acceleration should be low for this part so we have enough time to press the emergency button if the machine is about to hit something. These values can then be changed depending on your machine to give it greater maximum speed and acceleration if desired.
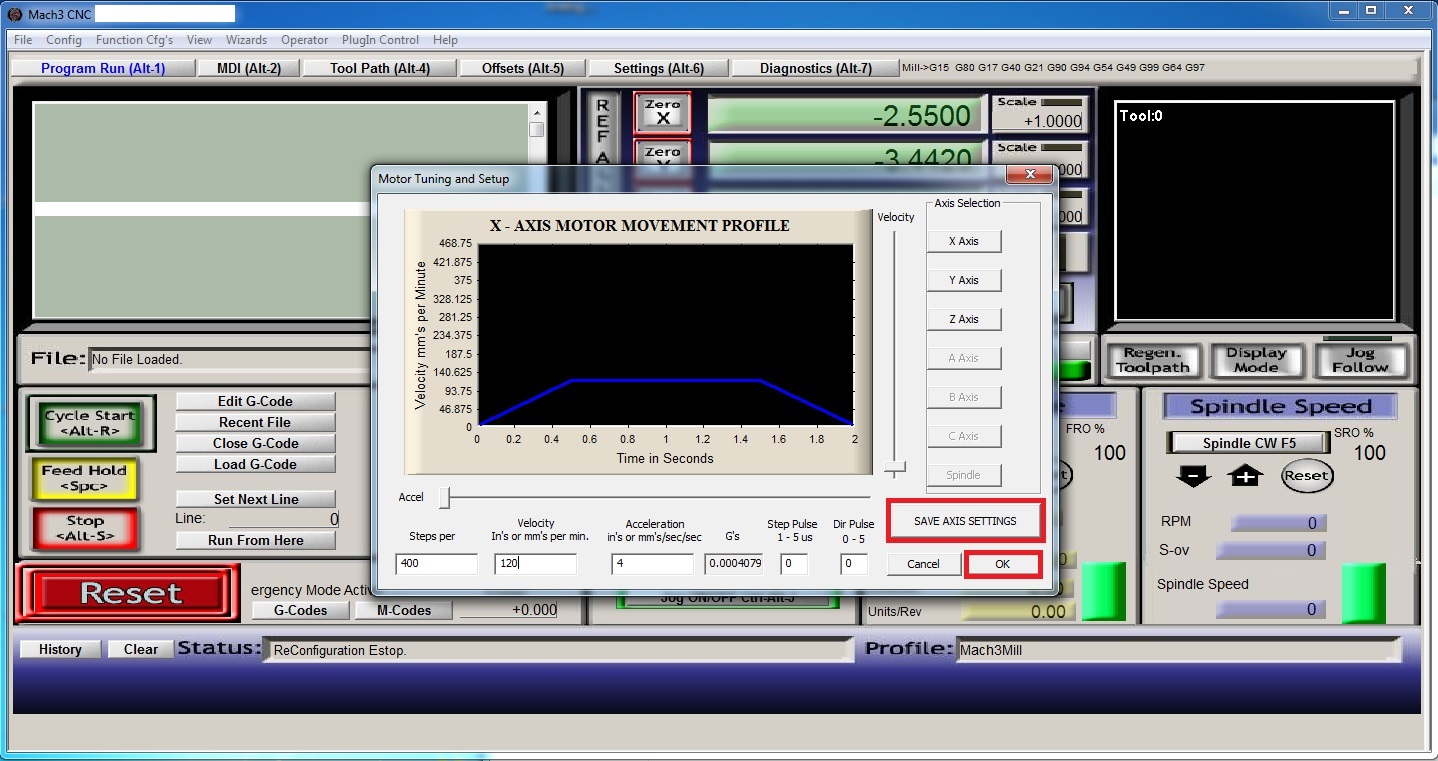
When done, click the »SAVE AXIS SETTINGS« button and repeat the configuration for all of the axis used. When done, click OK.
Configuring PoKeys plugin for Mach3
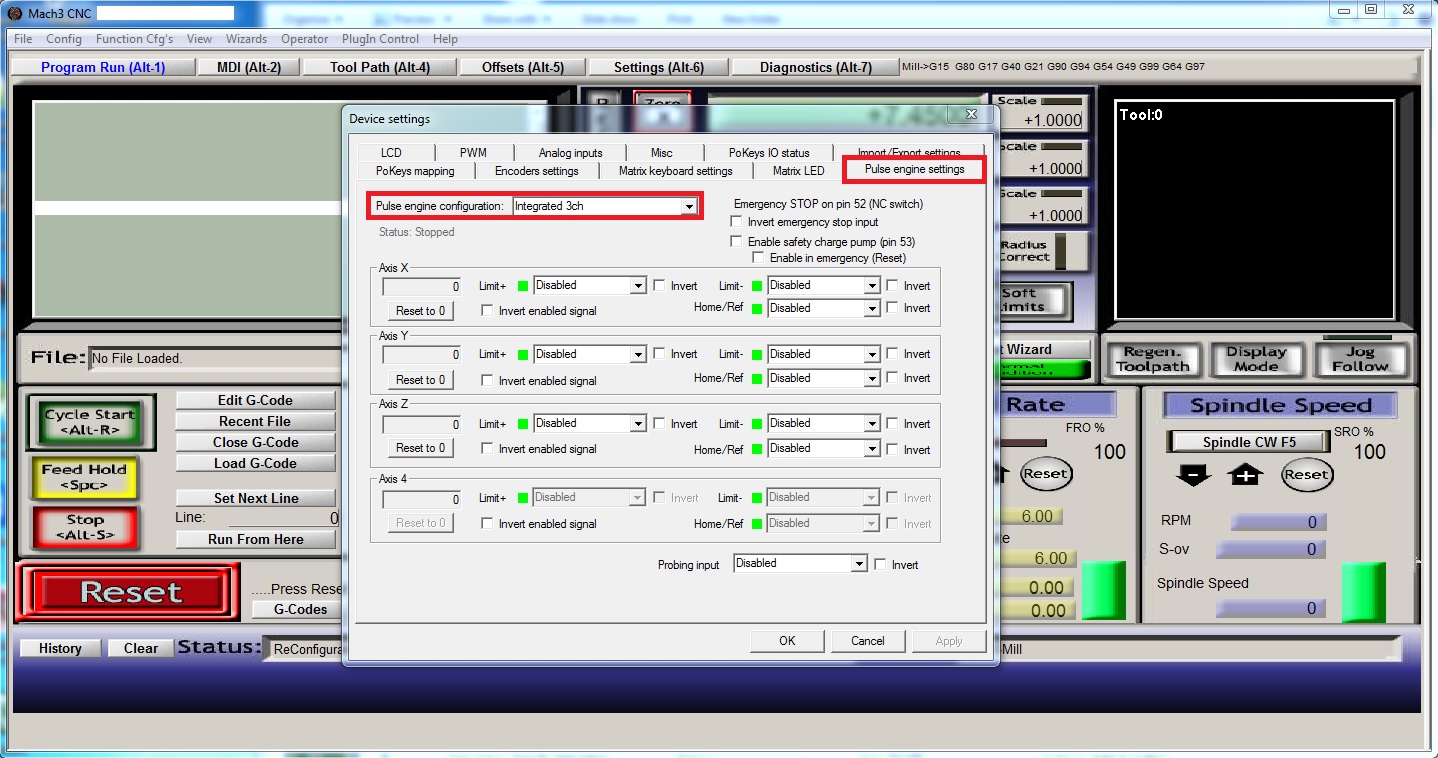
Now we also have to configure the PoKeys plugin. To do that, open the PoKeys plugin configuration. Click on the »PlugIn Control« menu and then select Configure PoKeys. A new window should open, and there click on the Pulse engine settings tab.
If there are any problems so far please redo the previous Mach3 setup tutorial.
For this example we have used the integrated 3ch pulse engine, so we selected this option on the Pulse engine configuration window. In the case of PoKeys57CNC or PoKeys57CNCdb25, the 4ch external pulse generator with IO is automatically preselected in the list. If PoKeys57U/E is used with PoExtBusOC16-CNC, select 4ch external without IO option in the list.
If you have not done that already, you should wire an emergency button to the PoKeys before continuing. By default, PoKeys devices expect NC (normally-closed) type of emergency switch. If you are using NO (normally-open) type, you can check the Invert emergency stop input option.
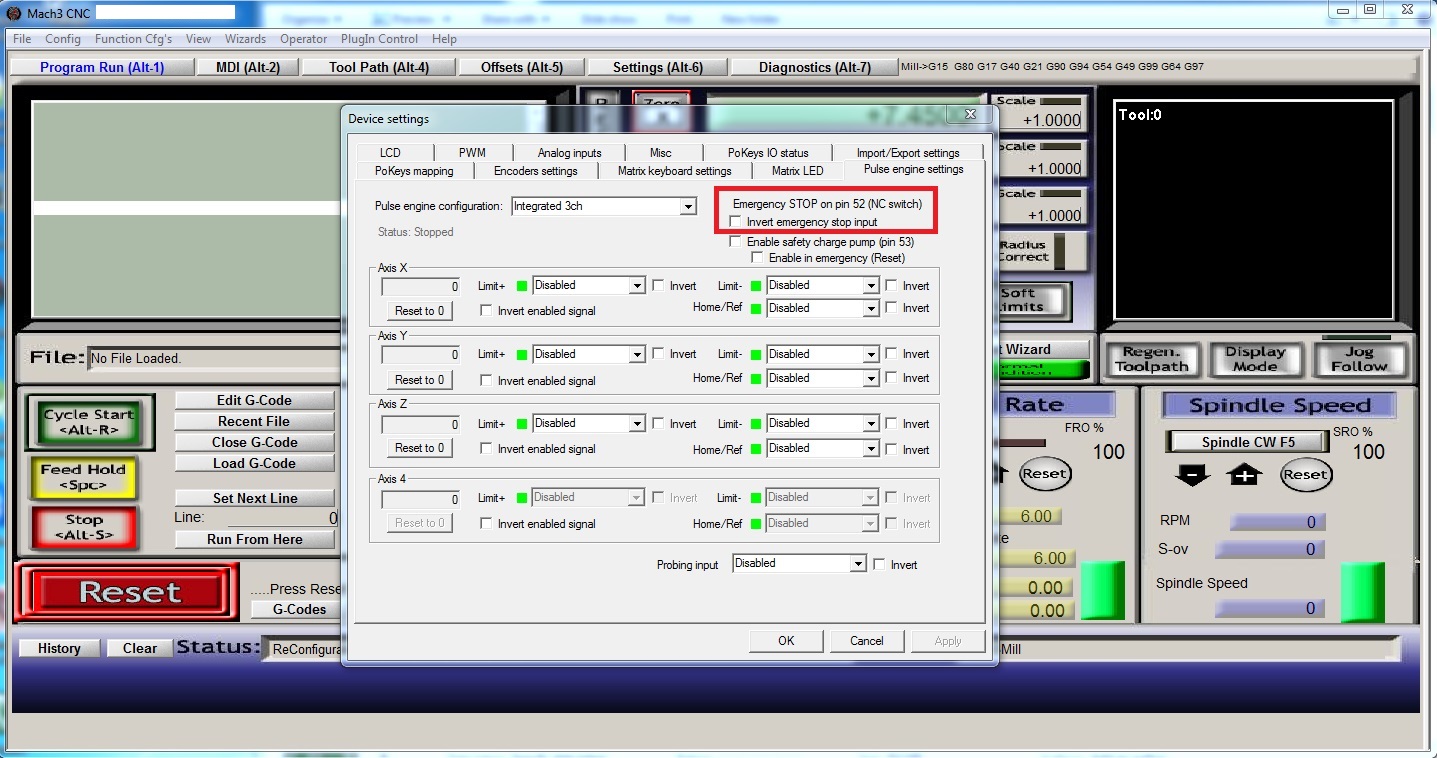
Next set all of the limit switches to Disabled, as we will configure this in the next tutorial.
Major pin functions will automatically be configured by the plugin (in the case of PoKeys57U or PoKeys57E) devices, as can be seen in the PoKeys mapping tab.
PoKeys57CNC: not all pins are available in this device – check the device pinout diagram on the homepage or manual on which pins are available for mapping.
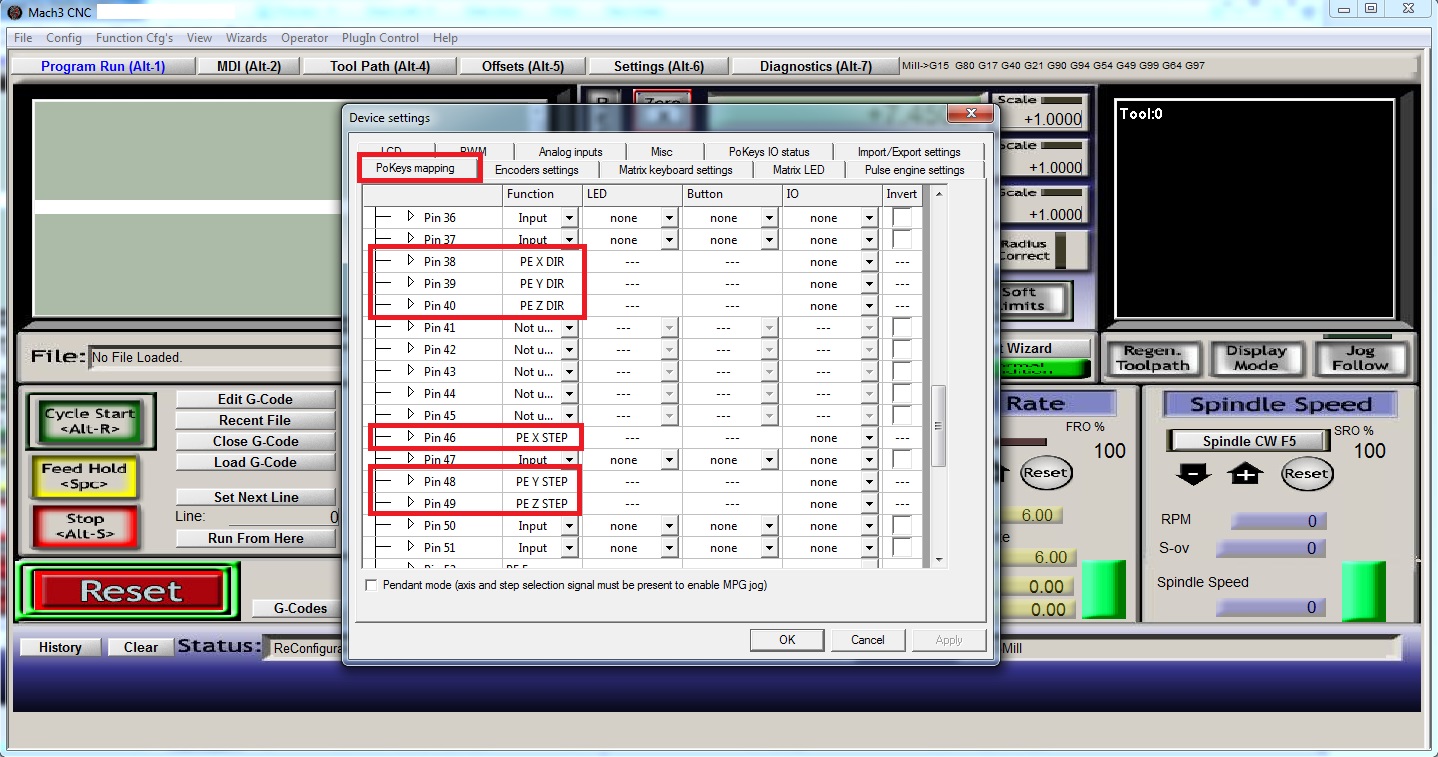
Different PoKeys devices use different pins for this function, so the pin mapping may not be the same as in the picture.
Testing configuration
If you have done everything correctly you should be able to move your CNC by pressing the keys on your keyboard. Put the device out of reset first. To move your CNC on the X or Y axis you should press the arrow keys, and to move the Z-axis you should press the page up or page down key.
If the motors don’t spin please recheck the connections and proper configuration of the Mach3 and PoKeys plugin.
It is possible that the stepper motor moves in the wrong direction. There are two possible ways to correct this. You can do it in Mach3 or change the connection to the driver.
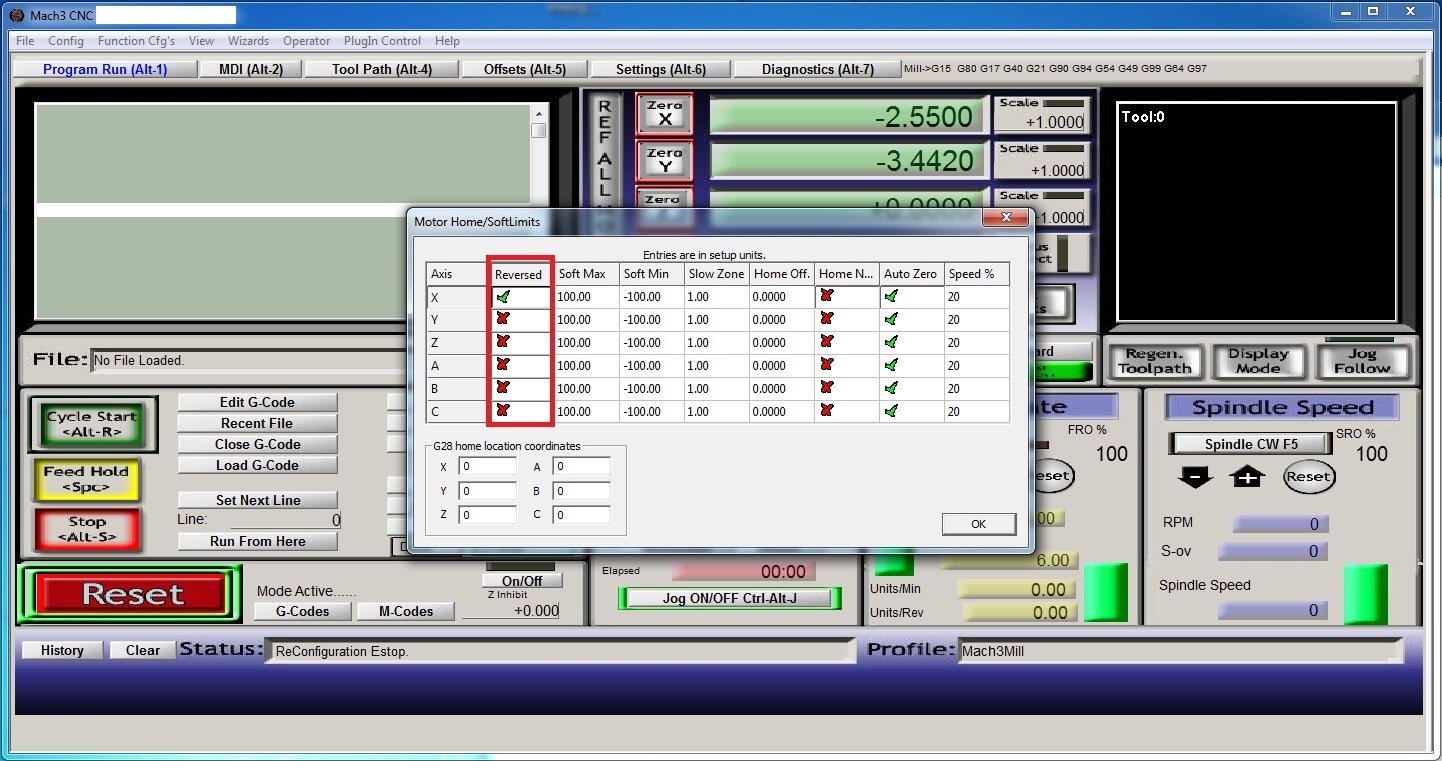
To change the direction in Mach3 click on the »Config« button in the menu, and then click on the »Homing/Limits« option. A new window should open. Here you should see a reverse option for each of the axis. To change the direction, simply click on the reverse option for the axis you want to change the direction.
Another way is to rewire the stepper motor connected to the driver. This can be done by reversing the connections to one winding. For example, you should switch the wires connected to the A and A’ terminals or B and B’ terminals. If the red wire is connected to A and blue to A’, you must connect the blue to A and red to A’ to reverse direction.
In one of the previous steps, we had to manually calculate and input the »step per« value. This can also be done automatically in Mach3. The best way is still to manually calculate it, because there can be errors due to measurements. But this feature is still useful for checking your calculations. Please make sure that you are ready to press the emergency button in case the machine should hit something since the limit switches have not been configured yet. I recommend that you move your machine to the center before starting the calibration.
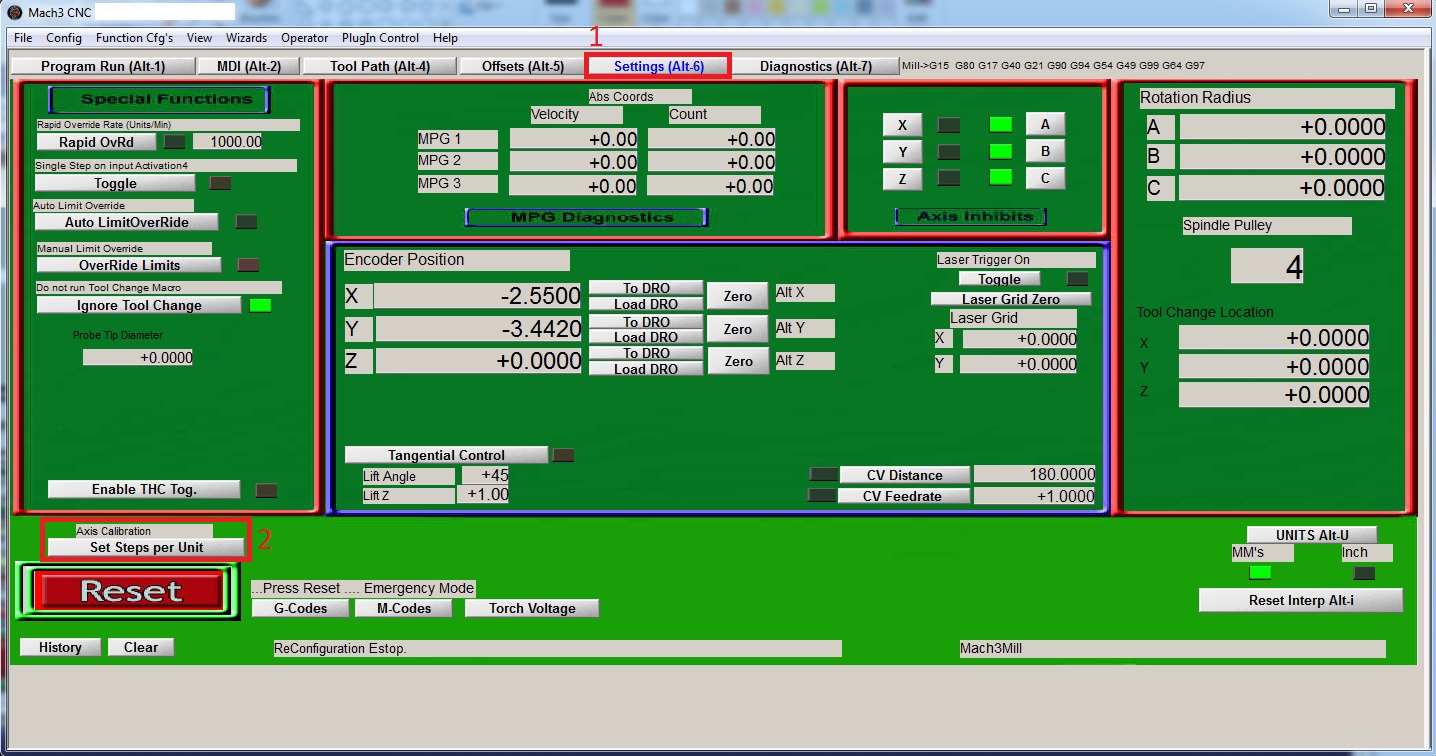
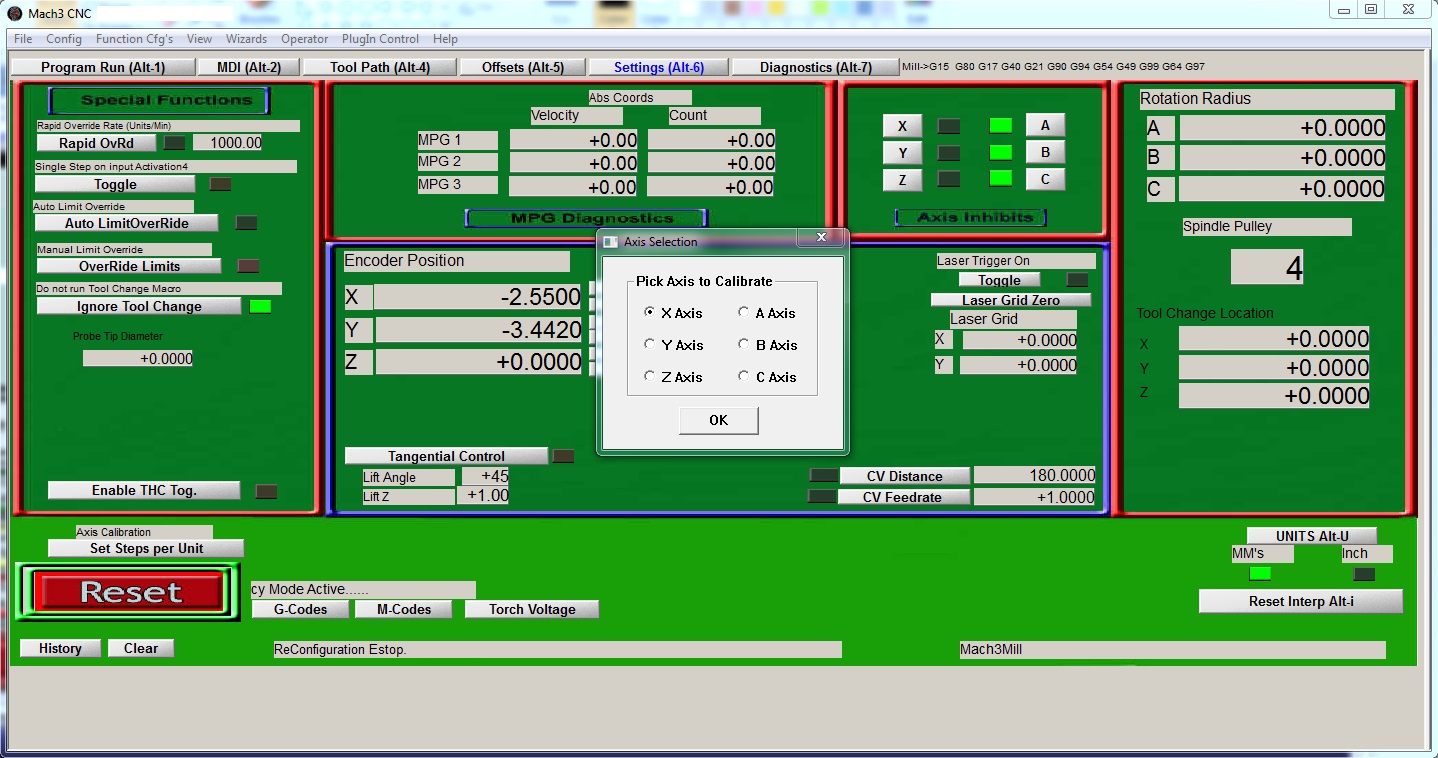
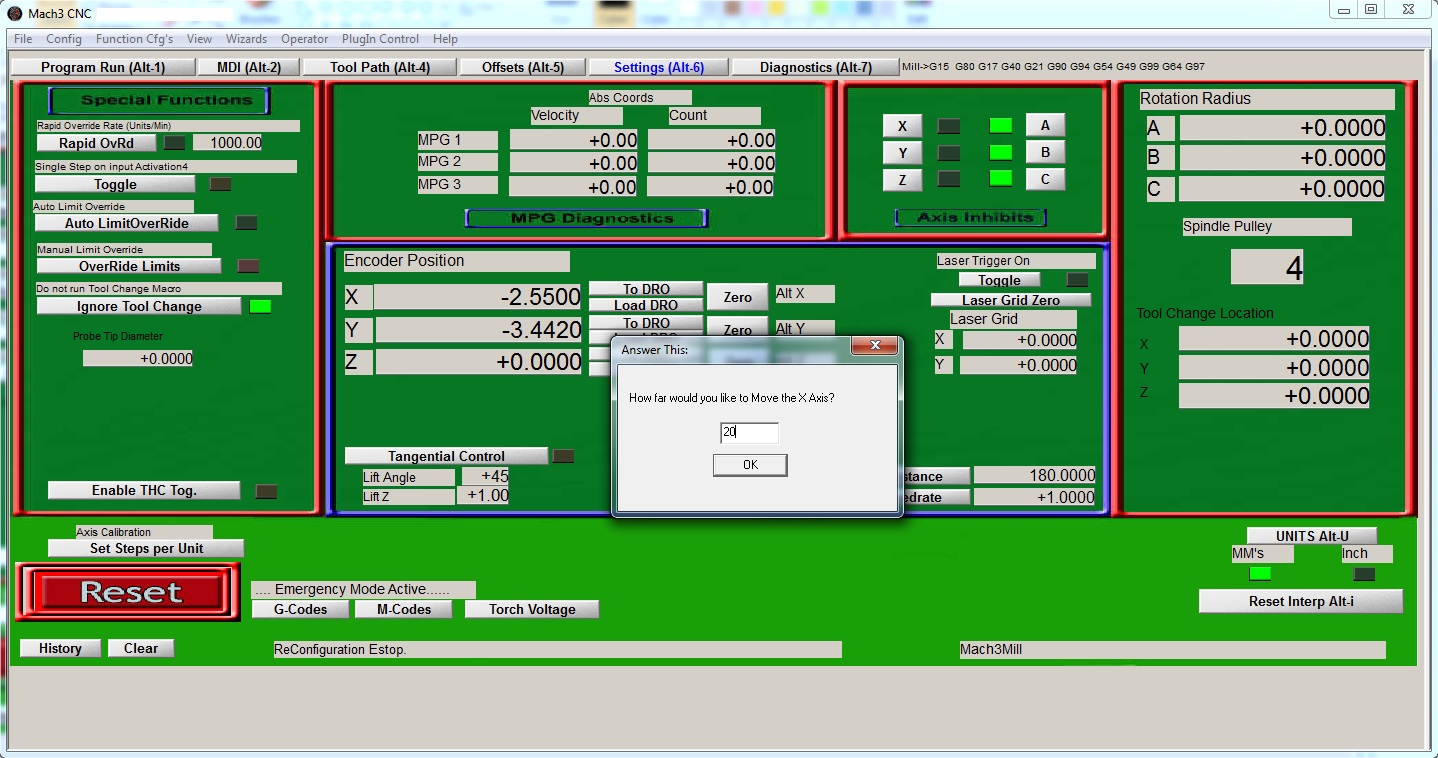
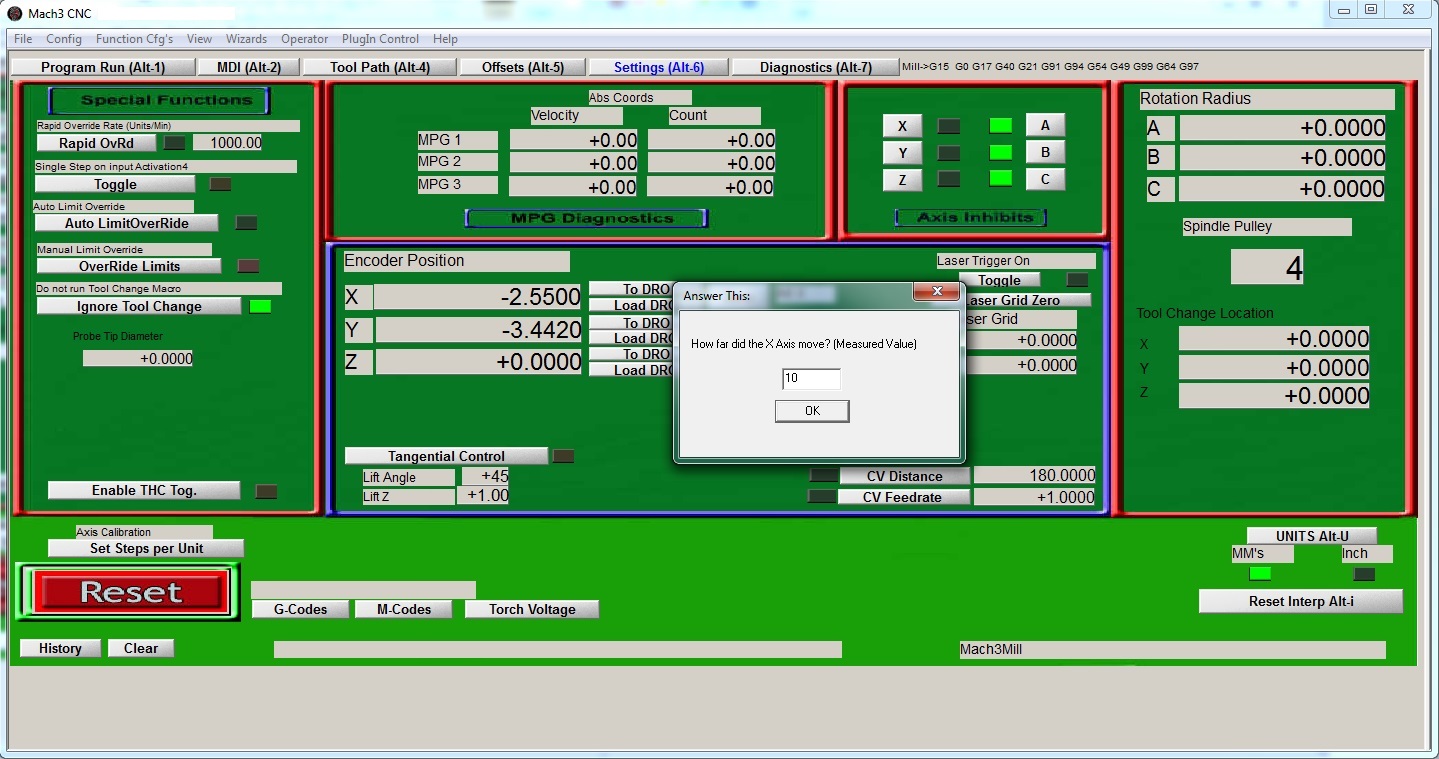
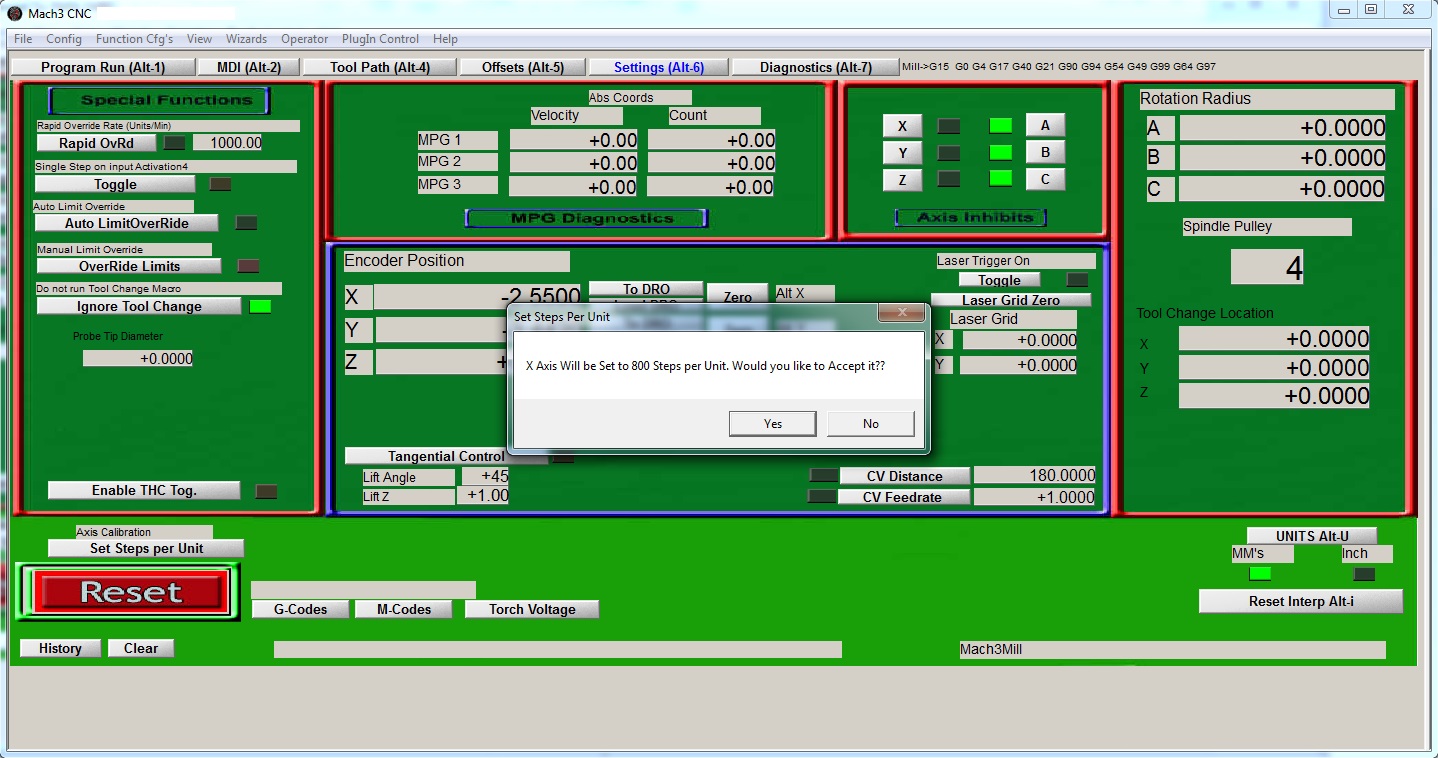
To start the calibration click on the Settings tab (or access it by pressing Alt key and then 6). In the lower-left corner, above the Reset button, there should be a »Set Steps per Unit button«. Click on it and follow the instructions. When done, Mach3 will provide you with a new Step per Unit value. If it is about the same of what you calculated, you do not have to accept it, since your calculations are correct. If not you can either accept the new value or recalculate it yourself.
Conclusion
If you have done everything correctly you should now be able to move your CNC machine from the keyboard and even actually use it to make something. However, I don’t recommend using a machine without the limit switches properly configured. We will cover this in the next Mach3 setup tutorial. If your CNC machine isn’t moving, please retry all of the steps from this Mach3 setup tutorial.
If you think that your machine can go faster or is maybe too fast and the stepper motors are losing steps simply adjust the Velocity and Acceleration options in the Motor tuning configuration.