If you use a THC plasma cutter with Mach3 and would like to switch to Mach4 plasma, there is a quick guide how to setup the torch height controller.
The Mach4 version 2 has support for THC plasma cutter. If you have been using Mach3, there are some differences in settings for THC in Mach4. First I would like to point out that it is necessary to download the latest version of the Mach4 software. You will find the 4.2.0.4300 version on www.machsupport.com/software/mach4/. Also important is that you use the latest PoKeys setup package and PoKeys Mach4 plugin to support torch height controller PlasmaSens.
The THC plasma cutter wiring – already done
In this article, we will not talk about how to connect the torch height controller PlasmaSens to the plasma cutter and CNC controller PoKeys57CNC. So I assume you already have a working plasma system. If you would like information about PlasmaSens you can read the article about Mach3 plasma setup.
Mach4 plasma – Motor tuning settings
The first major difference compared to Mach3 is the configuration of the motors. However, Mach4 plasma THC is handled with a so-called out-of-band (OB) motor. For example, if your THC plasma cutter uses Motor2 for Z-axis you will need also to enable axis OB1(6) and select the Motor for that axis. In our case, we will choose Motor5.
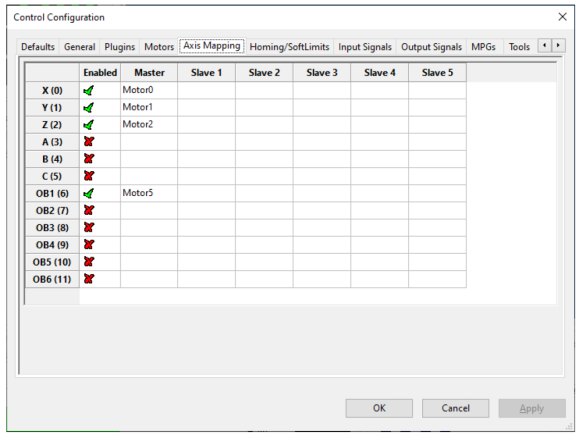
Next, a very important thing is motor tuning settings. Settings of Z-axis motor, in our case Motor2 must match those of Motor5 (OB1-axis).
Mach4 plasma – THC plasma settings
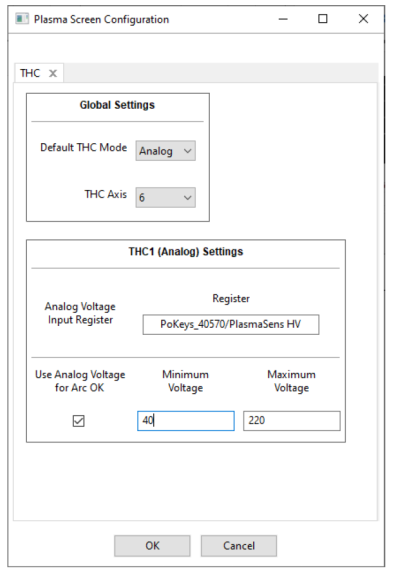
On the “Configure” tab, the new Mach4 version offers the user a window to configure the plasma screen. We use torch height controller PlasmaSens so we must select “Analog” mode and for “THC Axis” we choose 6 (OB1- axis). Under “THC1(Analog) Settings” we must write the correct “Analog Voltage Input Register” name. The name depends on PoKeys serial number. In our example, we must type exactly: PoKeys_40570/PlasmaSens HV. Do not forget to mark “Use Analog Voltage for Arc OK” and enter the minimum and maximum voltage for Arc OK signal.
Plasma cutter – start and probe signals
Our plasma cutter system needs two basics signals. Output signal that initiates arc and input signal for probing. Both signals must be mapped in the “Control Configuration” window. For probing, we will use a floating head switch and map the input to the dedicated probe’s input terminal. Similarly, we will enable mapping “Spindle On” to Relay 1. G-code commands M3 and M5 will turn on/off the Relay1.
Before first cut – THC Cut Start Settings window and THC tab
We set Target Voltage, Adjust Rate, and Ant-Dive Rate:
- Target Voltage: the voltage Mach4 will maintain for optimal cut
- Adjust rate: the speed at which torch will move to achieve Target Voltage
- AntiDive Rate: the rate at which XY Blend Velocity will disable the AntiDive function
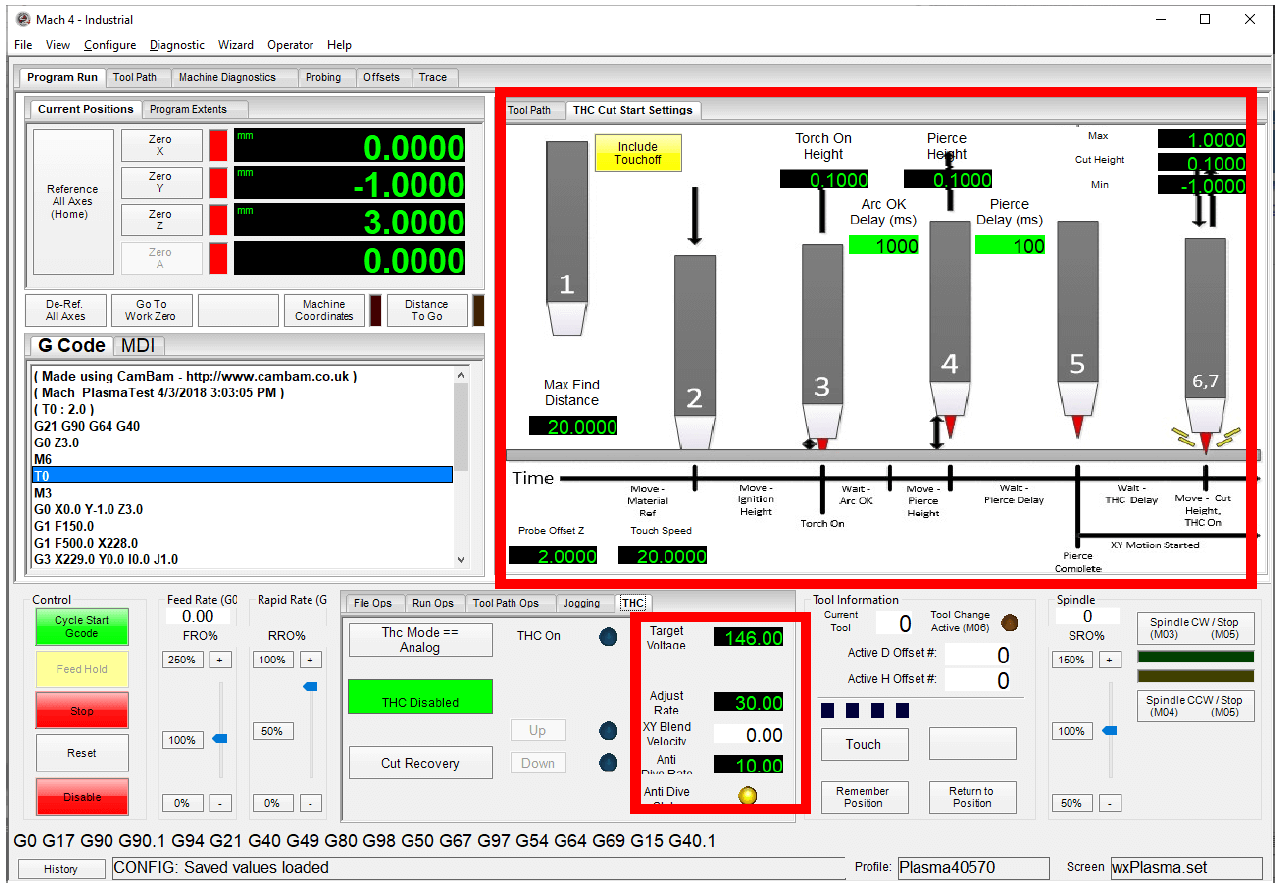
Mach4 Plasma allows user to define start cutting parameters:
- Include Touchoff /Omit Touch Off: enable/disable the probe input in case we want to omit the material touch off as part of the M3 sequence (no probe or testing)
- Max Find Distance: distance the torch (Z-axis) will travel to find the material top, probe’s switch activates
- Touch Speed: units per minute Z-axis will travel during the probing
- Torch On Height: Z-Axis position at M3 command
- Pierce Height: the Z-axis position when a pierce begins
- Arc OK Delay (ms): Time in milliseconds, the THC waits to start controlling height
- Pierce Delay (ms): Time in milliseconds allowed to complete piercing material
- Cut Height: optimal distance between the material and torch during cutting
- Min: Minimum height THC, while trying to achieve target voltage moving the torch down
- Max: Minimum height THC, while trying to achieve target voltage moving the torch up