Here is a quick guide on how to easily perform Mach3 plasma setup. This article will guide you through the process of setting THC with your CNC controller board and Mach3.
Let’s get to the point! How to use plasma with Mach3?
Mach3 plasma setup quick guide
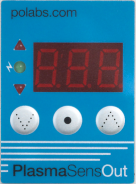
First, let me briefly introduce our two products from the torch control PlasmaSens series and the difference between them. PlasmaSens and PlasmaSensOut are designed on modern 32-bit microprocessor’s voltage measurement technology. Moreover, the device offers two arc voltage level inputs. High voltage input up to 350 VDC or low voltage input up to 10 VDC. The last one is suitable for cutters with internal voltage divider output. However, PlasmaSens comes with the optical interface and is meant to be used with CNC controller board PK57CNC. While on the other hand PlasmaSensOut comes with a user-friendly HMI device and can be connected with any other CNC controller board. PlasmaSensOut namely generates universal THC control signals Arc_OK, Torch_Up, and Torch_Down.
First, we will describe the case with PlasmaSens and PK57CNC. Description for PlasmaSensOut can be used to set up any other generic CNC controller board.
Mach3 setup
If you will working with Mach3 for the first time here is a link where to download it: Mach3 download page. I also advise you to browse on YouTube how to start with Mach3. We will run the Mach3 Plasma profile.
The next thing if you are going to use PlasmaSens with a PK57CNC controller is to download the PoKeys configuration package and run the installation. The PoKeys Mach3 plugin will be automatically installed along with the app. To be sure, you can check if PoKeys.dll exists in C:\Mach3\PlugIns folder. It is always a good idea to install the latest application and plugin version!
In this article, we will focus on THC setup options and we will assume that we already set the axis, motor parameters, and limit switches.
PlasmaSens
First, we have to power up PlasmaSens and establish communication with PoKeys57CNC. Connect AC power supply (110 VAC-230 VAC/50-60 Hz) and apply optical cable to PlasmaSens and optical interface. Make sure you remove plastic caps at the optical transmitter/receiver and protection caps on the optical cable. When you insert the cable, you will feel a click.
How to connect to cutter’s voltage?
There are two ways. The first is connecting directly to the cutter’s output. In that case, you will probably need to do some adaptation on the cutter itself as usually doesn’t have such an output. Make sure you use a double isolated short wire for voltage detection. You should use an HV input terminal pin1 and pin6. Watch for polarity! A cutter’s clamp is a positive voltage potential and it goes to pin1.
The second way is using a divided voltage that some plasmas manufacturer have factory installed. 50:1 ratio will be perfect for PlasmaSens 10V input (pin-3 and pin-4).
 Click to enlarge: connection to HV or divided output
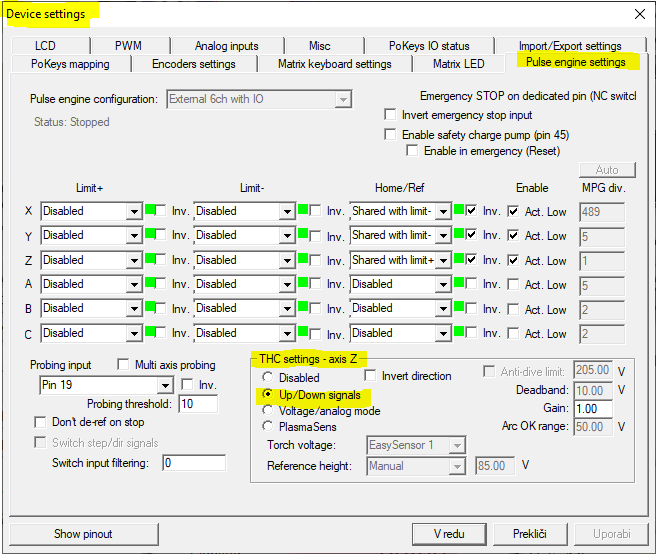
Connect optical interface flat cable with red micro-match connector to PoKeys57CNC (PoExtension2). All settings regarding THC we can do it in PlugIn control -> Configure PoKeys57CNC -> Pulse engine settings tab.
Choose PlasmaSens in THC setting -axis Z section group. To use a split 10V input, you must select the Easy Sensor (ID) number that corresponds to the PlasmaSens 10 V input. However, you must first select Voltage/analog mode to be able to change Torch voltage input and then switch back to PlasmaSens.
Parameters
Reference height-> Manual and write the rated operating voltage value of your cutting machine.
Deadband – voltage hysteresis (voltage frame around reference height, a range where the position of the Z-axis is not changing).
Gain – correcting motion gain (reduce the gain if the torch height is oscillating).
Arc OK range – voltage range where THC will be active (reference height ± arc OK range).
 PoKeys Mach3 plugin settings
The plasma cutting is a pretty delicate thing so you should do some experimental cuts to achieve the best settings for your cutter’s equipment.
PlasmaSensOut
Installation of PlasmaSensOut system is to a good extent the same as installation PlasmaSens. But in this case, we connect the optical cable to the HMI device. The device also needs external DC power supply voltage (6V-36V). PlasmaSensOut has three standard THC output signals (Arc_OK, Up and Down).
The outputs are of the solid-state relay type. That means low resistance (Ron< 0.6 Ohms) between output and common terminal when active. If I generalize we use them as normally open switches. That’s why, on the controller board side, inputs should be pulled up as it is already done on PoKeys57CNC. In case your controller board hasn’t got a pull-up resistor on input ports, you must apply an external pull-up resistor. Normally the resistor 1kOhm, between each input and power supply line, should be appropriate. We must connect the common terminal to GND at the CNC controller board! Mach3 plasma setup using THC up, down, and OK signals we described in the next section.
 Click to enlarge: connection when no pullup on the controller side
Mapping PlasmaSensOut signals in Mach3 PoKeys plugin
In Mach3 software under Plugin Control-> Configure PoKeys57CNC->Device settings you will find PoKeys mapping tab. Map connected pins as shown below. In our example, we select PoKeys pin 8, 12, and 13 as input.
 Signals mapping in PoKeys plugin
In Pulse engine settings tab in group THC settings-axis Z select Up/Down signals.
 Select Up/Down signals option
HMI menu option
Press V / ꓥ button to set Reference Voltage value.
To enter a setup menu press and hold • button for one sec. The LED display will start flashing then the setup menu will appear. Select the parameter you would like to change by pressing V / ꓥ button and confirm with • button. Press V / ꓥ button to modify the parameter’s value.
Sdt – Set delay time from 0.1 to 9.9 sec. The time between Arc OK signal appears and generation of signals up and down is enabled.
HYS – Hysteresis from 2V to 32 V (2 V step). Voltage frame around reference. If arc voltage is higher than Ref + HYS/2 then down signal is generated. If voltage is lower than Ref – HYS/2, up signal is generated (see the output signal example below).
AdL – Ant-dive limit from 50 V to 300 V. Arc voltage that disables THC. If the voltage goes higher than the Anti-dive limit all output signals go low. The parameter’s value must be set higher than the reference voltage.
tSt – Test mode. Only available when no arc voltage present! Pressing V or ꓥ button generates output signals. The display indicates a simulated direction.
 HMI – LED display and navigation buttons
Plugin options- extra
Inside Plugin Control-> Configure PoKeys57CNC->Device settings there are some additional options at Pulse engine settings tab .
As we already described, we can select up/Down signals, PlasmaSens or not mentioned yet Voltage/analog mode option. If we selected the last option, we can select Torch voltage input to be one of the EasySensors or one of PoKeys analog inputs. Be aware max 3.3V can be applied to the PoKeys analog input pin!
There are a few options for a Reference height. We can choose between manual, one analog inputs or OEM DRO1601.
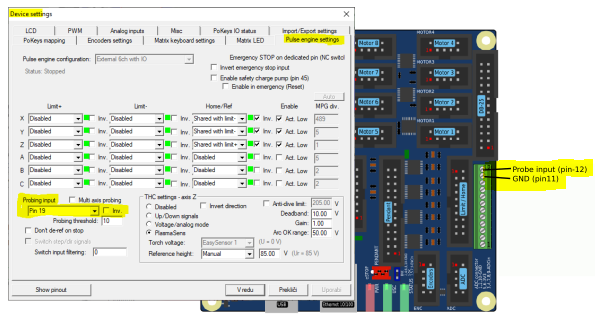
Probing input: select probe’s input invert it if necessary and set threshold!
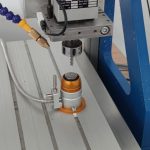
Probe setup (floating head)
The floating head switch (Z-axis probe) is also an important Mach3 plasma setup. In our case, we select Probing input: Pin 19 and connect the switch to PoKeys57CNC between pin-11 and pin-12 as marked in the picture below. NO or NC switch can be used thanks to “inv” option in the plugin setup.
 Probing setup
Cutter switch ON/OFF setup
For example, We will use the PoKeys57CNC onboard Relay 1 as a plasma turn ON switch. Go to Device setup -> PoKeys mapping -> Pulse engine -> Output and for Relay 1 select IO Output#1. Run G-code with M3 and M5 command and check if the Relay1 is switched On/Off.
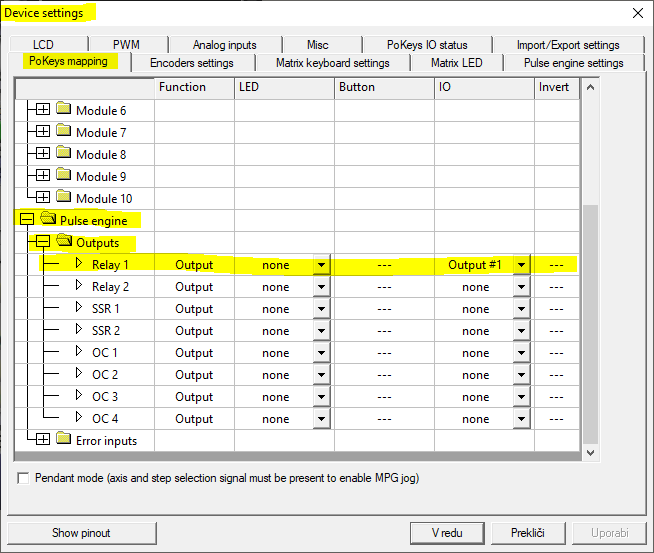 Mapping Relay1 as a cutter switch ON/OFF
Basics of Mach3 plasma G-code
The THC mode must be manually turned on (THC button is green). Use M03 command in G-code to start (Torch-On) and M05 to stop (Torch Off) the plasma arc. Use code G31 for probing. Keep in mind that if THC mode is ON executing off the G-code will be stopped if the Arc_OK signal is not activated. THC Min and THC Max limit the range of motion of the Z-axis in THC mode. In case we would like a negative value for THC Min we must change the value in the Plasma.xml file in the Mach3 folder (search for THCMin and THCMax).
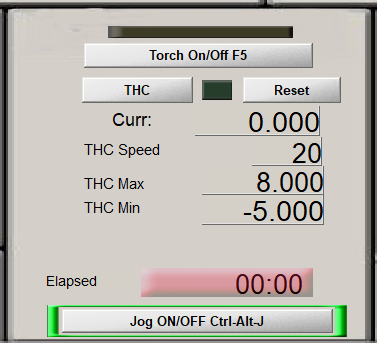 Mach3 enabling THC mode
I suggest you install also one of the Mach3 Plasma screen set. How to do that we have already written in one of our previous blog (Plasma THC screen set Mach3).