This tutorial will explain how to correctly use the Machine/Home feature.
The homing procedure will reference machine axes and set machine work area.
First, you would need to configure your machines step per unit values, motor & soft limits, and limit switch inputs of the controller:
How to set step per unit values in PlanetCNC TNG software
How to configure limit switch inputs of the controller in PlanetCNC TNG software
How to set motor & soft limits in PlanetCNC TNG software
Homing procedure configuration
The homing procedure is configured in settings: File/Settings/Program Options/Home
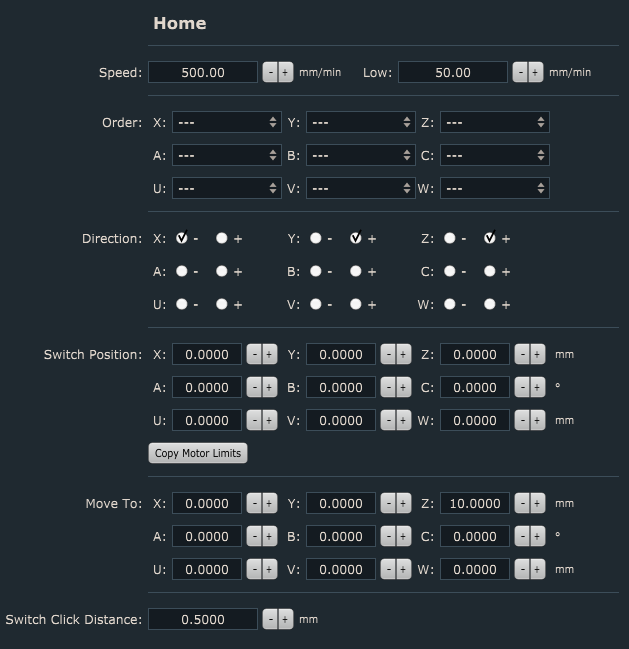
Speed & Low:
Speed and Low are speed values of first and second axis reference moves.
The first reference move will be performed at Speed value. After the limit switch is activated, the machine retracts for the switch click distance and starts with the second reference move, but this time at a Low-speed value.
Make sure that the Speed value is not set too high to the point where the limit switch or machine could get damaged. The low value should be significantly lower than the Speed value.
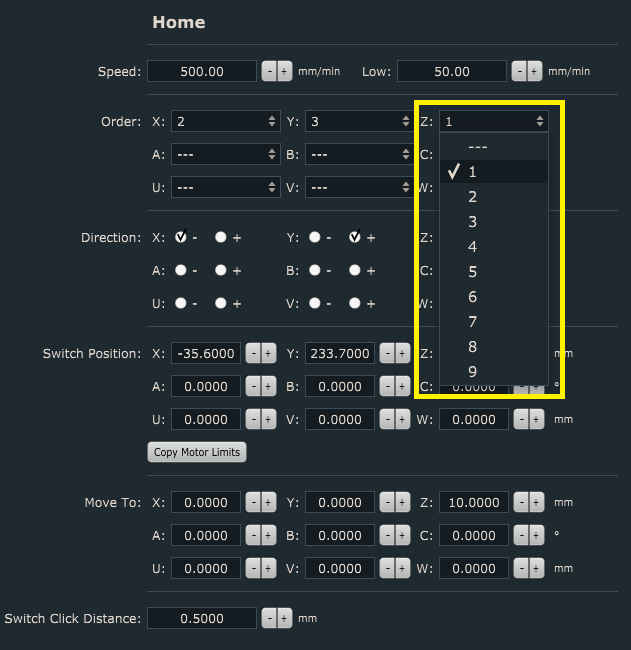
Order:
To set homing order of the specified axis, select the order number from the drop-down menu:
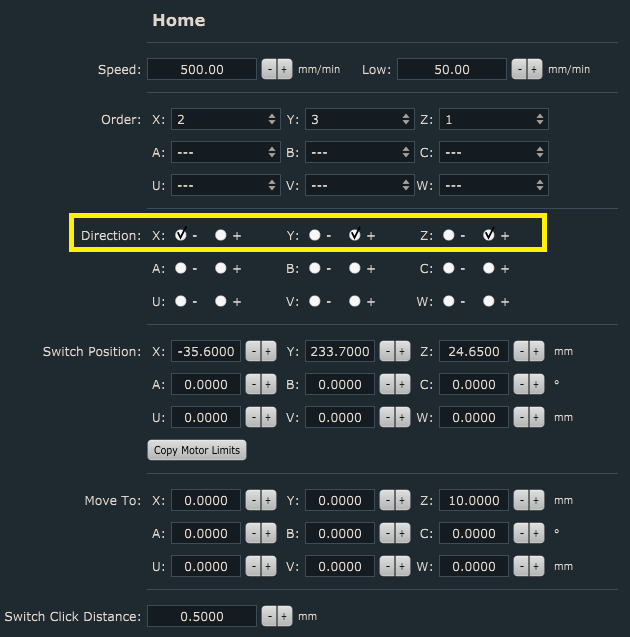
Direction:
To set the homing direction of the specified axis, click the radio button of the axis direction option, – or +. So, if your Y-axis limit switch is mounted at the positive end of the Y-axis, you enable “+” for Y:
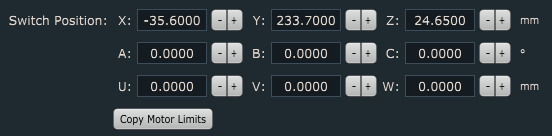
Switch Position:
The switch Position value is the axis machine position at which the corresponding axis limit switch gets activated. These values, to some degree, have already been obtained in How to set motor & soft limits in the PlanetCNC TNG software tutorial.
For example, during Homing procedure when e.g. X-axis is being referenced and its limit switch is activated, X-axis will get the assigned machine position value of the Switch Position value.
To automatically populate all axis Switch Position values, click the Copy Motor Limits button. However, these values are not values of limit switch activation but previously obtained motor limit values…
Obtaining axis switch position values:
Slowly jog the Z-axis up until the Z+ limit switch is hit and the machine stops. Write down the Z+ axis machine position.
If your X limit switch is mounted at the positive end of the X-axis: Slowly jog X-axis in a positive direction until the X+ limit switch is hit and the machine stops. Write down X+ axis machine position.
If your X limit switch is mounted at the negative end of the X-axis: Slowly jog X-axis in the negative direction until X- limit switch is hit and the machine stops. Write down the X-axis machine position.
If your Y limit switch is mounted at the positive end of the Y-axis: Slowly jog Y-axis in a positive direction until the Y+ limit switch is hit and the machine stops. Write down the Y+ axis machine position.
If your Y limit switch is mounted at the negative end of the Y-axis: Slowly jog Y-axis in the negative direction until the Y-limit switch is hit and the machine stops. Write down the Y-axis machine position.
Now insert all values that you obtained for switch positions into their corresponding field values…
Move To:
Each axis will travel to its dedicated Move To position immediately after being referenced. These are machine position values.
Switch Click Distance:
This is the distance from the point where the limit switch is activated and to the point when it is released.
Homing sequence:
You can execute homing procedure via Machine menu Machine/Home or left toolbar button: 
When Homing is executed, homing sequence(as set above – see screenshots) will be:
Z-axis will be referenced first. Axis will move in a positive direction until the Z-axis limit switch is activated. When the switch is activated machine stops and moves to the position set with Z “Move To”(Z=10mm).
The X-axis will be referenced second. Axis will move in a positive direction until the X-axis limit switch is activated. When the switch is activated machine stops and moves to the position set with X “Move To”(X=0mm).
Y-axis will be referenced third. Axis will move in a positive direction until the Y-axis limit switch is activated. When the switch is activated machine stops and moves to the position set with Y “Move To”(Y=0mm).
Home script file
The homing procedure uses a script file. If you would like to edit script code or to have a more in-depth look at the procedure itself, you can do that by opening the script file.
You can access and edit script file:
In settings under File/Settings/Program Options/Scripts/Home & Measure -> Home, click button Edit Script. The script file will open in the TNG code editor. In order for the Home script file to be generated and saved in your profiles Script folder, you need to click the Save button.